はじめに
技術部に5日間のインターンに参加させていただいた高石です。 この記事ではその期間に実装した追尾機能を搭載したParticleシステム についてこの記事ではまとめます。また平山さんが書かれていた記事を参考にJobSystemで並列化されていた部分をComputeShaderを使った実装に変更していきました。
デモ動画
GPGPU_Particle from keito takaishi on Vimeo.
コードはGitHubにあがっています。
処理の流れ
- 追尾経路の計算
- 追尾の際に通過した経路の離散ポイントの保存
- 2で保存した座標から複数のParticleをEmit
- (おまけ)爆発エフェクト
1.追尾経路の計算
ここの計算方法としては先ほど紹介した記事で紹介されている方法を使用しています。
物体の加速度は接戦加速度と向心加速度によって構成されているのですが、追尾の際にかかる力は3つで中心へ向かう向心力、推進加速度、空気抵抗です。軌道を変える肝になってくるのがその中の向心力centripetalAccelでこれが加速度を発生させる要因となってきます。
これらの力を算出することが出来れば後は積分(離散なのでシグマ)計算をしてあげるだけでいいので微小時間dtをかけて総和を求めていきます。
var toTarget = target.transform.position - position;
var vn = vel.normalized;
var dot = Vector3.Dot(toTarget, vn);
var centripetalAccel = toTarget - (vn * dot);//vn * dot : targetへのベクトルを速度ベクトル上へ射影したベクトル
var centripetalAccelMagnitude = centripetalAccel.magnitude;
if (centripetalAccelMagnitude > 1f){
    centripetalAccel /= centripetalAccelMagnitude;
}
var force = centripetalAccel * maxCentripetalAccel;
force += vn * propulsion;
force -= vel * damping;
vel += force * Time.deltaTime;
position += vel * Time.deltaTime;
this.transform.position = position;
2.追尾の際に通過した経路の保存
このステップでは、追尾経路の先頭のみに注目してRenderTextureに対してテクセルをずらしつつ座標情報を保存していきます。
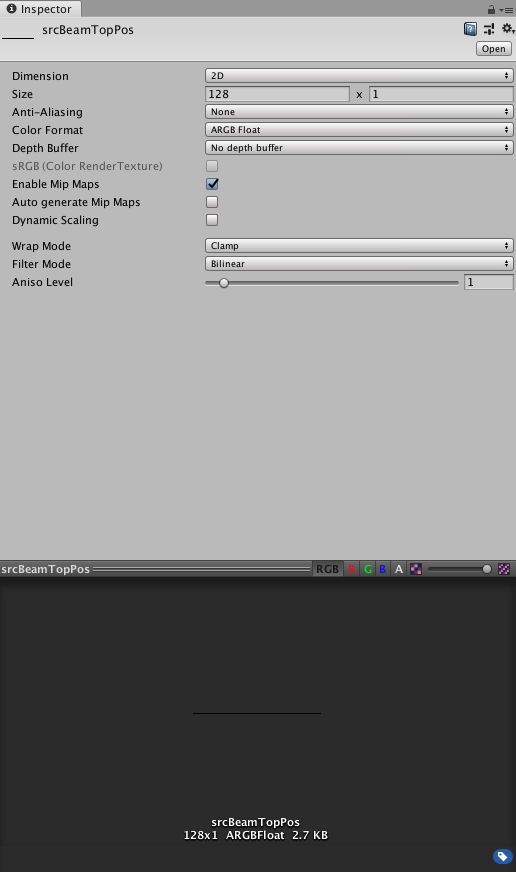
Textureの用意
ここで注意しないといけないことはTextureformatをARGBFloatにすることです。でないと座標情報の値がマイナスになった際に正確な値を保存できません。またSizeのX成分が経路のプロットを1度に保存できる最大数になります。またTextureSizeはComputeShaderのThread数の定数倍にしてください。(今回のComputeShaderのThread数は(64, 1, 1)です)

C#とComputeShader
C#側の重要そうな部分のコードを一回貼ります。
//BakeBeamTop.cs

private void Awake(){
            dstBeamTopRenderBuffer.Release();
            dstBeamTopRenderBuffer.enableRandomWrite = true;//書き込み用に変更
            dstBeamTopRenderBuffer.Create();
}

private void LateUpdate(){
//...省略...

            cs_rt.SetInt("topIndex", topIndex);
            cs_rt.SetFloat("dt", Time.deltaTime);
            cs_rt.SetVector("topPos", new Vector4(position.x, position.y, position.z, 1.0f));
            cs_rt.SetVector("targetPos", new Vector4(target.transform.position.x, target.transform.position.y, target.transform.position.z, 1.0f));
            cs_rt.SetBuffer(kernelId, "lifeBuffer", lifeBuffer);
            cs_rt.SetTexture(kernelId, "srcBeamTopRenderBuffer", srcBeamTopRenderBuffer);
            cs_rt.SetTexture(kernelId, "dstBeamTopRenderBuffer", dstBeamTopRenderBuffer);
            uint thread_x, thread_y, thread_z;
            cs_rt.GetKernelThreadGroupSizes(kernelId, out thread_x, out thread_y, out thread_z);
            cs_rt.Dispatch(kernelId, (int)(dstBeamTopRenderBuffer.width / thread_x), (int)(dstBeamTopRenderBuffer.height / thread_y), 1);
        }
            Graphics.CopyTexture(dstBeamTopRenderBuffer, srcBeamTopRenderBuffer);
            topIndex = (topIndex + 1) % (dstBeamTopRenderBuffer.width * dstBeamTopRenderBuffer.height + 1);
//...省略...
}
この中でもポイントとなるのは2点あります。
1つ目は
Graphics.CopyTexture(dstBeamTopRenderBuffer, srcBeamTopRenderBuffer)の部分でこのメソッドでComputeShaderによってTextureへ書き込まれた最新の情報を読み込み専用のTextureへコピーしています。2つめは
topIndexでこの変数がComputeShader側でRenderTextureアクセスするuv座標となります。
続いてComputeShader側のコードです。
#pragma kernel ArchiveTop

Texture2D<float4> srcBeamTopRenderBuffer;
RWTexture2D<float4> dstBeamTopRenderBuffer;
RWStructuredBuffer<float2> lifeBuffer;

int topIndex;
float dt;
float4 topPos;
float4 targetPos;

[numthreads(64,1,1)]
void ArchiveTop (uint id : SV_DispatchThreadID)
{
    int i = id;
    if(i == topIndex){
        dstBeamTopRenderBuffer[float2(i, 0.0)] = float4(topPos.x, topPos.y, topPos.z, 1.0);
        lifeBuffer[i].y = lifeBuffer[i].x;
    }else{
        if(lifeBuffer[i].y > 0.0){
            float4 p = float4(0.0, 0.0, 0.0, 0.0);
            p = srcBeamTopRenderBuffer[float2(i, 0.0)];

            float dis = length(targetPos.xyz - p.xyz);
            if(dis < 0.1){
               lifeBuffer[i].y = 0.0;
               dstBeamTopRenderBuffer[float2(i, 0)] = float4(0.0, 0.0, 0.0, 1.0);
            }else{
               lifeBuffer[i].y -= dt * 3.0;
            }
        }else if(lifeBuffer[i].y < 0.0){
            lifeBuffer[i].y = 0.0;
        }
    }
}
やっいることしては結構シンプルでtopIndexに対応するテクセルにアクセスしているthreadに対しては追尾経路の先頭の座標を保存とその点から発生するParticleに対してのlifeを代入しています。またそれ以外のthreadに対しては座標の更新、lifeの削減、衝突した際の座標の初期化を行っています。
lifeBufferについて
上のC#のコードでは深く触れなかったのですが、lifeへは少し工夫がしてありまして、float2型のComputeBufferになっているんですが第一成分がlifeのMax値, 第二成分が現在のlife値という構造にしています。Particleごとにmax値を変えてあげればlifeに散らばりが生まれて演出面で効いてくると思います。
void initComBuf()
{
        for(int i = 0; i < bufferSize; i++)
        {
            lifeList.Add(new Vector2( Random.RandomRange(3.0f, 5.0f), 0.0f));
        }
        lifeBuffer.SetData(lifeList);
}
3. 追尾の際に通過した座標から複数のParticleをEmit
このステップでParticleをEmitしていきます。Emitの仕方としては先ほどまでに求めたPositionBufferを元にSurfaceShaderでGpu Instancingを行います。(プロットした点ごとに複数Particleみたいなイメージなので最大Particle数はRenderTextureの解像度 x プロット1点からでるParticle数)
Instancingについてざっくり
Instancingでは同じMeshを大量にレンダリングすることが出来ます。Instancing後にVertexShaderで座標、スケールなどを変化させることでそれぞれのMeshに対して変化を加えることが出来ます。今回はQuadをInstancingするMeshとしています。
Unityで手っ取り早くInstancingを行うにはC#側ではInstancingに必要な情報をargsBufferへ詰め込んでDrawMeshInstancedIndirectをコールします。またHLSL側ではSurfaceShaderを使用して、#pragma multi_compile_instancingを定義することでインスタンシングバリアントがされshaderのベースは完成すると思います。
public class ParticleEmitter : MonoBehaviour
{
    #region instancingParams
    ComputeBuffer argsBuffer;
    private uint[] args = new uint[5];
    private int instancingCount;
    [SerializeField] private Mesh srcMesh;
    [SerializeField] Material instancingMat;
    #endregion


  private void LateUpdate()
 {
        instancingMat.SetInt("particleNumPerEmitter", particleNumPerEmitter);
        instancingMat.SetVector("textureSize", new Vector4(emitPositionBuffer.width, emitPositionBuffer.height, 1, 0));
        instancingMat.SetBuffer("lifeBuffer", bakeBeamTop.LifeBuffer);
        Graphics.DrawMeshInstancedIndirect(srcMesh, 0, instancingMat,
        new Bounds(Vector3.zero, Vector3.one * 100.0f), argsBuffer);
 }

   void initInstancingParams()
 {
        instancingCount = emitPositionBuffer.width * emitPositionBuffer.height * particleNumPerEmitter;
        argsBuffer = new ComputeBuffer(1, args.Length * sizeof(uint), ComputeBufferType.IndirectArguments);
        args[0] = srcMesh.GetIndexCount(0);
        args[1] = (uint)instancingCount;
        args[2] = srcMesh.GetIndexStart(0);
        args[3] = srcMesh.GetBaseVertex(0);
        args[4] = 0;
        argsBuffer.SetData(args);
    }
}
とりあえずSurfaceShader内のVertexShaderの部分だけを載せます。
補足:座標変換に関するScaleMatrix(), TranslateMatrix()はfloat3からmatrixに変換する独自の関数を用いています。
void vert(inout appdata v, out Input o) {
                UNITY_INITIALIZE_OUTPUT(Input, o);
                #ifdef UNITY_PROCEDURAL_INSTANCING_ENABLED
                float id = 0.0;
                float4 position = float4(0.0, 0.0, 0.0, 0.0);
                int instanceID = 0;
                instanceID = unity_InstanceID;
                id = fmod(instanceID, InstanceNum);
                float uvx = id  / textureSize.x;
                float2 delta = float2(1.0, 1.0) / textureSize;
                delta /= 2.0;
                float4 uv = float4(uvx+delta.x, delta.y, 0.0, 0.0);
                position = tex2Dlod(positionRenderTexture, float4(uv));

                float3 noise = curlNoise(float4(position.x*10.0, instanceID*10.0, instanceID*10.0, _Time.y * 0.1));
                float2 life = lifeBuffer[(int)id];
                position.xyz += noise * 0.25 * pow((life.x - life.y), 1.3);
                float scaleOff = 0.025 * (pow(life.y, 1.5)-1.0);
                o.color = lerp(_Color, _EndColor, (life.x - life.y)/life.x);

                float4  vertex = mul(ScaleMatrix(float3(scaleOff, scaleOff, scaleOff)), v.vertex);
                v.vertex = mul(TranslateMatrix(position * 1.0), vertex);

                #endif
            }
VertexShader内で行っている処理の流れとしてはこんな感じ
- RenderTextureへプロットした座標の取得
- 1つのプロット点からでる複数のParticleをNoiseによって散らす
- Scale, Colorなどを事前にComputeShaderで計算した値を元に更新
- 座標変換
補足:SurfaceShader内でVertexShaderを使用する方法
1. RenderTextureへプロットした座標の取得
unity_InstanceIDはInstancingされるMeshごとにユニークに与えられるIDです。自分はこのIDが0から始まっているか少し不安になったのでInstanceする数でmoduloを演算することで0~instancingNum-1にマップしています。 この値はテクセル値なのでTextureのサイズで割ることでuvへ変換しています。deltaは画素の中心へシフトさせるための変数です。
instanceID = unity_InstanceID;
id = fmod(instanceID, InstanceNum);
float uvx = id  / textureSize.x;
float2 delta = float2(1.0, 1.0) / textureSize;
delta /= 2.0;
float4 uv = float4(uvx+delta, 0.0, 0.0, 0.0);
position = tex2Dlod(positionRenderTexture, float4(uv));
2. 1つのプロット点からでる複数のParticleをNoiseによって散らす
今回散らすためにのNoiseへのシードへはParticleそれぞれによって異なるinstanceIDを用いています。(今回はあんまり上手くNoiseを使いこなせていなそう...)
また生成されてから時間が立つほど(lifeが減少するほど)散らばりが大きくなる、かつ非線形にしたかったのでpowを用いて計算を行いました。
float3 noise = curlNoise(float4(position.x*10.0, instanceID*10.0, instanceID*10.0, _Time.y * 0.1));
float2 life = lifeBuffer[(int)id];
position.xyz += noise * 0.25 * pow((life.x - life.y), 1.3);
3. Scale, Colorなどを事前にComputeShaderで計算した値を元に更新
Scaleに関しては先ほどと同じようにpowを用いてlifeが減るごとに小さくしています。またColorに関してはlifeに応じた線形補完を行っていて、outの構造体を通して最終的に見た目を決定するSurf関数へ渡しています。また今回使用したTextureはunityにデフォで入っている物を使用しています。
float scaleOff = 0.025 * (pow(life.y, 1.5)-1.0);
o.color = lerp(_Color, _EndColor, (life.x - life.y)/life.x);
ハマったところ
実機でもfpsを落とさずに動かすことがこのプロジェクトのゴールだったんですが、Android(Galaxy8)へBiuldしてみたところエラーが出てしまいました。ComputeShaderには RWTexture<float4>と言う読み書きが可能Textureを扱う型があるのですが、GraphicAPIの関係で使用することが出来ませんでした。解決策として今回のように読み込み専用のTexture、書き込み専用のTextureと分けていました。またこの記事には記載していませんがgitに上がっているコードの中では2枚のTextureを使用せずに1つのComputeBufferで完結させたものも書かれています。そのためSurfaceShader内でRenderTextureでのバージョン用、ComputeBufferを使ったバージョン用にShaderVariantの作成も行いました。
4. (おまけ)爆発エフェクト
衝突した際の爆発エフェクトもComputeShader+GPU Instancingで生成しています。あらかじめinstance数分の一様乱数で構成された三次元ベクトルをBufferとして用意して用意しておいて散らす方向をユニークに、また上記で書いたようなLifeをユニークな物にすることで爆発の再現を行いました。
検証結果
MacBookPro(13-inch2017) では最大Particle数が9600の状況までFpsが60を保てました。またGalaxy8では最大Particle数が7040の状況までFpsが60を保てました。
おわりに
あっという間の5日間でしたがとても充実した楽しいインターンでした!
お世話になった平山さん、清水さんやお昼ご飯に連れて行ってくださった社員さんの方々ありがとうございました!