この記事はTech KAYAC Advent Calendar 2023の8日目の記事です。 こんにちわ。その他事業部SREチームの@mashiikeです。
最近、風変わりな記事を連投しているのですが、今回も風変わりです。
ひとことで要約すると、 私は!Github Actionsから!Redshiftにアクセスしたいんだ!!! です。
TL;DR
- dbtのCIを実現したい。ローカルのunit-testはできてるんだが、Github ActionsからRedshiftへのアクセスに難がある。
- Github ActionsからRedshiftにアクセスするために頑張ってみた。
- kayac/ecspressoで踏み台となるECS Taskを立ち上げる。
- fujiwara/ecstaでportforwardingする。
- mashiike/redshift-credentials で一時認証情報を手に入れてdbtのunit-testを実行!
- Test Report周りにはまだ難がある。
はじめに
Github ActionsからRedshiftにアクセスしたいと思うときがあります。
具体的には dbt を使ったパイプラインの実装で、unit-testをしている場合に継続的インテグレーション(CI)を実現したいときです。
dbtをご存知ないかたもいると思いますので、このあとの説明のために、すこし触れておきます。
dbtではテンプレートを用いた便利なSQLを書くことができます。
例えば、以下のようなSQLを書いたとします。
models/marts/dau.sql
{{
    config(
        materialized='incremental',
        unique_key=['ymd'],
    )
}}

select access_at::date as ymd, count(distinct user_id) as uu
from {{ source('log', 'nginx') }}
{%- if is_incremental() %}
where access_at::date >= {{ current_timestamp() }} - interval '5 days'
{%- endif %}
group by 1
上記の場合、dbtを経由するとこのSQLは1回目の起動では次のようにテンプレートが描画され、実行されます。
create table "dev"."public"."dau"
as (
select access_at::date as ymd, count(distinct user_id) as uu
from "dev"."source_log"."nginx"
group by 1
);
2回目以降で、すでにテーブルが存在している場合は次のようにテンプレートが描画され、実行されます。
create temp table dau__dbt_tmp
as  (
select access_at::date as ymd, count(distinct user_id) as uu
from "dev"."source_log"."nginx"
where access_at::date >= getdate() - interval '5 days'
group by 1
);

merge into "dev"."public"."dau"
using dau__dbt_tmp as src
on dau.ymd = src.ymd
when matched then update set uu = src.uu
when not matched insert values (src.ymd, src.uu);
このように、dbtはDWHの状態に応じていい感じにSQLを書き換えてくれるわけなのですが、 このテンプレートSQLにはロジックが入っているため、どうしても実装時には不安がつきものです。 そこで登場するのが、dbt-unit-testeingというパッケージです。
これを使って、ユニットテストをします。package.ymlにパッケージを追加したら以下のような3つのファイルを用意します
macros/override.sql
{% macro ref() %}
   {{ return(dbt_unit_testing.ref(*varargs, **kwargs)) }}
{% endmacro %}

{% macro source() %}
   {{ return(dbt_unit_testing.source(*varargs, **kwargs)) }}
{% endmacro %}

{% macro is_incremental() %}
  {{ return (dbt_unit_testing.is_incremental()) }}
{% endmacro %}

{%- macro current_timestamp() -%}
    {%- set mock_current_timestamp = config.get('mock_current_timestamp', none) -%}
    {%- if dbt_unit_testing.running_unit_test() and mock_current_timestamp is not none %}
        '{{ mock_current_timestamp }}'::timestamp
    {%- else %}
        {{ dbt.current_timestamp() }}
    {%- endif %}
{%- endmacro %}
tests/marts/dau/dau_initital.sql
{{ config(
    tags=['unit-test','dau'],
    mock_current_timestamp='2023-12-08 12:00:00',
) }}
{% call dbt_unit_testing.test('dau', 'initial load, distinct check') %}

  {% call dbt_unit_testing.mock_source('log','nginx',options={
        'input_format': 'csv',
    }) %}
    access_at::timestamp,method,path,user_id
    '2023-12-01 00:00:00','GET','/foo',1
    '2023-12-01 00:00:01','POST','/foo',1
    '2023-12-01 00:00:02','GET','/bar',2
    '2023-12-01 00:00:03','GET','/foo',3
    '2023-12-01 00:00:04','GET','/foo',4
    '2023-12-02 00:00:05','GET','/foo',5
    '2023-12-02 00:00:06','GET','/foo',6
    '2023-12-02 00:00:07','GET','/foo',7
    '2023-12-03 00:00:08','GET','/foo',7
  {% endcall %}

  {% call dbt_unit_testing.expect({
    'input_format': 'csv',
  }) %}
    ymd::date,uu
    '2023-12-01',4
    '2023-12-02',3
    '2023-12-03',1
  {% endcall %}

{% endcall %}
tests/marts/dau/dau_incremental.sql
{{ config(
    tags=['unit-test','dau'],
    mock_current_timestamp='2023-12-08 12:00:00',
) }}
{% call dbt_unit_testing.test('dau', 'incremental load, not change before 5 days ago') %}

  {% call dbt_unit_testing.mock_source('log','nginx',options={
        'input_format': 'csv',
    }) %}
    access_at::timestamp,method,path,user_id
    '2023-12-01 00:00:00','GET','/foo',1
    '2023-12-01 00:00:01','POST','/foo',1
    '2023-12-01 00:00:02','GET','/bar',2
    '2023-12-01 00:00:03','GET','/foo',3
    '2023-12-01 00:00:04','GET','/foo',4
    '2023-12-02 00:00:05','GET','/foo',5
    '2023-12-02 00:00:06','GET','/foo',6
    '2023-12-02 00:00:07','GET','/foo',7
    '2023-12-03 00:00:08','GET','/foo',7
    '2023-12-03 00:00:09','GET','/foo',8
    '2023-12-03 00:00:10','GET','/foo',9
    '2023-12-04 00:00:11','POST','/foo',1
    '2023-12-05 00:00:11','POST','/foo',1
    '2023-12-06 00:00:11','POST','/foo',1
    '2023-12-07 00:00:11','POST','/foo',2
    '2023-12-07 00:00:11','GET','/foo',3
  {% endcall %}

  {% call dbt_unit_testing.mock_ref ('dau',options={
        'input_format': 'csv',
    }) %}
    ymd::date,uu
    '2023-12-01',4
    '2023-12-02',3
    '2023-12-03',1
  {% endcall %}

  {% call dbt_unit_testing.expect({
    'input_format': 'csv',
  }) %}
    ymd::date,uu
    '2023-12-01',4
    '2023-12-02',3
    '2023-12-03',1
    '2023-12-04',1
    '2023-12-05',1
    '2023-12-06',1
    '2023-12-07',2
  {% endcall %}

{% endcall %}
そして、以下のようにコマンドを実行するとユニットテストが実行できるわけです。
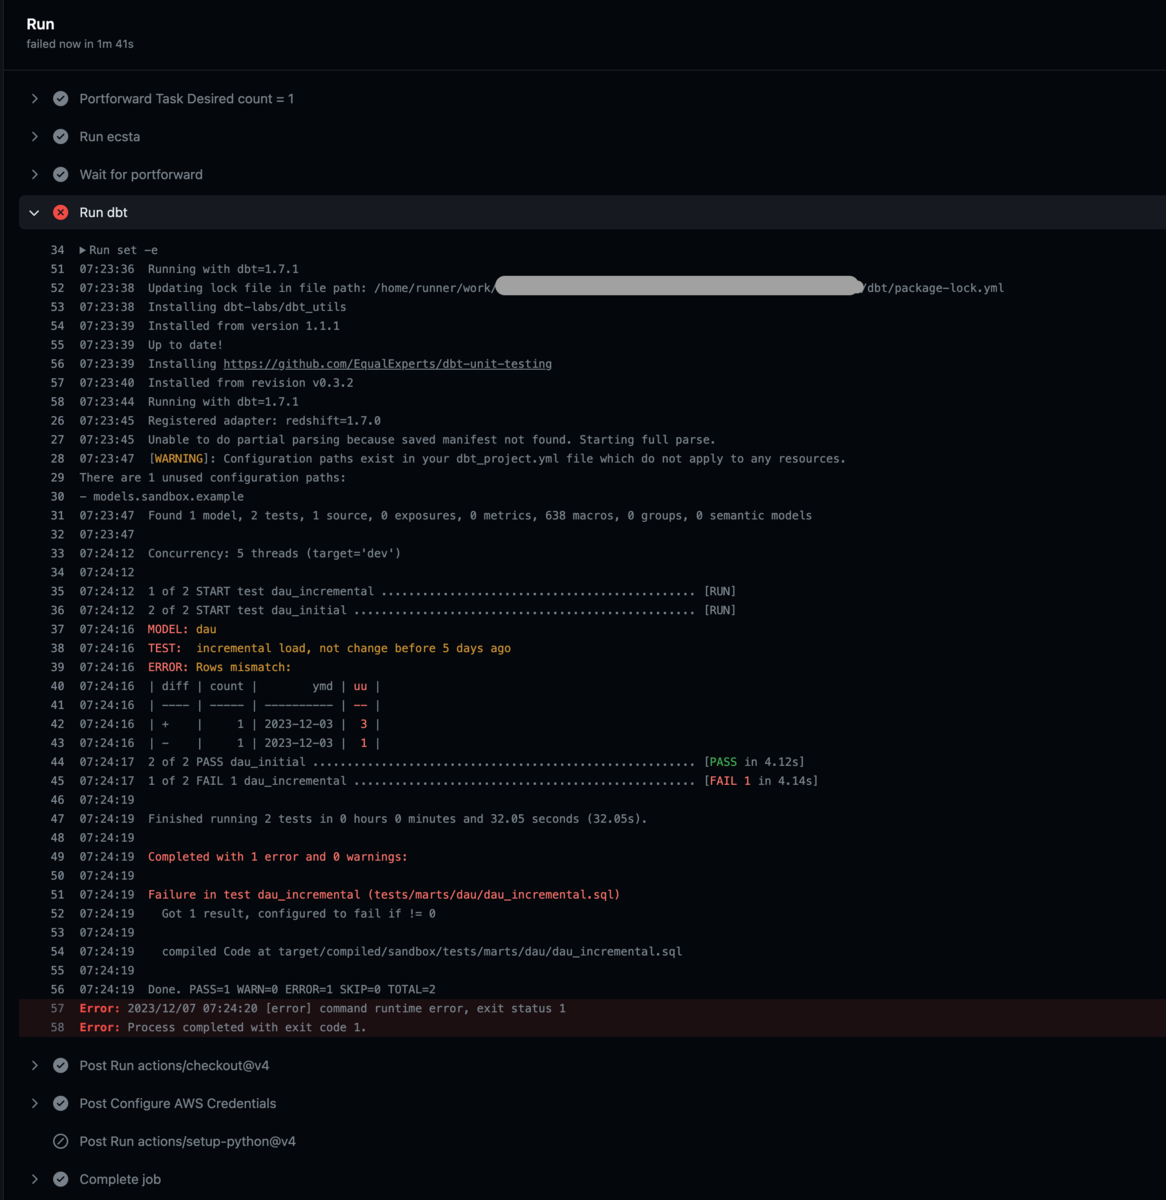
(.venv) $ dbt test --select tag:unit-test
04:49:26  Running with dbt=1.5.1
04:49:27  Found 1 model, 2 tests, 0 snapshots, 0 analyses, 530 macros, 0 operations, 0 seed files, 1 source, 0 exposures, 0 metrics, 0 groups
04:49:27
04:49:30  Concurrency: 8 threads (target='dev')
04:49:30
04:49:30  1 of 2 START test dau_incremental .............................................. [RUN]
04:49:30  2 of 2 START test dau_initial .................................................. [RUN]
04:49:30  MODEL: dau
04:49:30  TEST:  incremental load, not change before 5 days ago
04:49:30  ERROR: Rows mismatch:
04:49:31  | diff | count |        ymd | uu |
04:49:31  | ---- | ----- | ---------- | -- |
04:49:31  | +    |     1 | 2023-12-03 |  3 |
04:49:31  | -    |     1 | 2023-12-03 |  1 |
04:49:31  2 of 2 PASS dau_initial ........................................................ [PASS in 1.04s]
04:49:31  1 of 2 FAIL 1 dau_incremental .................................................. [FAIL 1 in 1.07s]
04:49:31
04:49:31  Finished running 2 tests in 0 hours 0 minutes and 4.23 seconds (4.23s).
04:49:31
04:49:31  Completed with 1 error and 0 warnings:
04:49:31
04:49:31  Failure in test dau_incremental (tests/marts/dau/dau_incremental.sql)
04:49:31    Got 1 result, configured to fail if != 0
04:49:31
04:49:31    compiled Code at target/compiled/blog/tests/marts/dau/dau_incremental.sql
04:49:31
04:49:31  Done. PASS=1 WARN=0 ERROR=1 SKIP=0 TOTAL=2
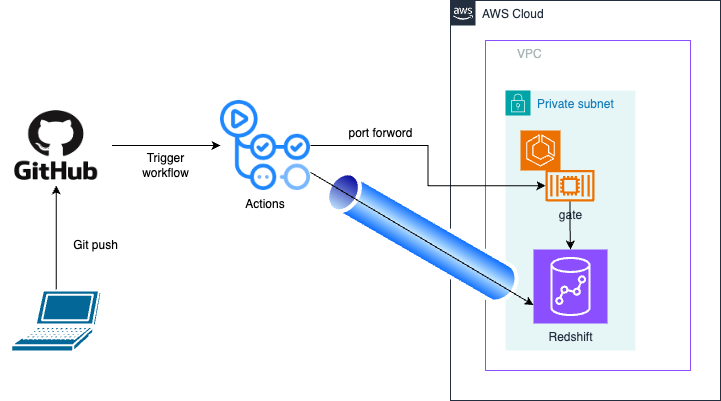
さて、だいぶ前置きが長くなりましたが、このユニットテストをPull Requestを作るたびにGithub Actionsで実行したいのです。 普通のアプリケーション開発では、もはや常識的なこのCIをdbtで実現するためにはネックになるポイントがあります。 それは、ターゲットにしているRedshiftがAWSのVPC内のリソースであるという点です。 dbtのユニットテストは Redshift上でモックデータを使ってSQLを実行しているため、Redshiftへのアクセスが必要になります。 しかし、Github Actionsのデフォルトのランナーは当然のごとくRedshiftが存在している VPC外に存在します。
つまり、Github Actionsから 『VPC越え』をして、Redshiftにアクセスする方法がなにか必要なのです。
Github ActionsでVPC越えしたい。
前提の条件を整理します。
- RedshiftはあるAWSアカウントのVPC内に存在している。
- セキュリティ上の懸念でRedshiftのPublic AccessibilityをONにしたくはない。
- Github ActionsのSelf hosted runnerは管理が面倒なので避けたい。
- ~できるだけコストはケチりたい~
ローカルマシンからはどうやって接続しているか?という問いがあると思いますが、ecstaというツールを使ってVPC内のTaskを踏み台にしてアクセスしています。
$ ecsta portforward --local-port 5439 --remote-port 5439 --remote-host default.123456789012.ap-northeast-1.redshift-serverless.amazonaws.com --region ap-northeast-1

Starting session with SessionId: aws-go-sdk-1701928550568167000-0770a0ebb15a8ea78
Port 5439 opened for sessionId aws-go-sdk-1701928550568167000-0770a0ebb15a8ea78.
Waiting for connections...
こちらのツールは非常に便利で、ECS ExecができるECS Taskに対してremote portforwardを簡単に実行できます。 ですので、ローカルマシンでは localhost:5439 にアクセスすることでdbtを実行できるようになっています。
これと同じことを、Github Actions上で実現できればいいということです。 図にすると、以下のようになります。
解説はさておき、具体的なWorkflowの定義はこちらになります。
name: dbt tset

on:
  workflow_dispatch:
    inputs:
  pull_request:
    paths:
      - 'dbt/**'

permissions:
  id-token: write
  contents: read

jobs:
  main:
    name: Run
    runs-on: ubuntu-latest
    defaults:
      run:
        shell: bash
    steps:
      - uses: actions/checkout@v4
      - uses: aquaproj/aqua-installer@v2.2.0
        with:
          aqua_version: v2.16.4
      - uses: actions/setup-python@v4
        with:
          python-version: '3.11'
          cache: 'pip' # caching pip dependencies
      - run: pip install -r requirements.lock
      - name: Setup mashiike/redshift-credentials
        uses: mashiike/redshift-credentials@v0.3.3
        with:
          version: latest
      - name: Configure AWS Credentials
        uses: aws-actions/configure-aws-credentials@v4
        with:
          role-to-assume: arn:aws:iam::123456789012:role/github-actions
          aws-region: ap-northeast-1
      - name: Portforward Task Desired count = 1
        working-directory: docker
        run: |
          aqua exec ecspresso scale --tasks=1
      - name: Run ecsta
        run: |
          set -e
          TASK_ID=$(aqua exec ecsta list --region ap-northeast-1 --cluster default --service gate --family gate --output json | jq -s '.' | jq -r 'map(select(.lastStatus == "RUNNING")) | first | .taskArn')
          aqua exec ecsta \
            portforward \
            --region ap-northeast-1 \
            --cluster default \
            --service gate \
            --id $TASK_ID \
            --container ecs-task-self-terminator  \
            --family gate \
            --local-port 5439 \
            --remote-port 5439 \
            --remote-host default.123456789012.ap-northeast-1.redshift-serverless.amazonaws.com \
            &
      - name: Wait for portforward
        timeout-minutes: 1
        run: |
          while ! nc -z localhost 5439; do
            sleep 1
          done
      - name: Run dbt
        working-directory: dbt
        run: |
          set -e
          dbt deps
          redshift-credentials --workgroup default -- dbt test --select tag:unit-test
しれっと、CLI ツールを管理するためのaquaというツールが登場していますが、管理用のファイルはこちらになります。
---
# aqua - Declarative CLI Version Manager
# https://aquaproj.github.io/
# checksum:
#   enabled: true
#   require_checksum: true
#   supported_envs:
#   - all
registries:
- type: standard
  ref: v4.86.0 # renovate: depName=aquaproj/aqua-registry
packages:
- name: fujiwara/ecsta@v0.4.1
- name: kayac/ecspresso@v2.2.4
気になる方はこちら をご確認下さい。
このWorkflowについて解説していきます。
踏み台にするECS Taskを kayac/ecspressoで立ち上げる。
Portforwardを行うにしても、接続先が存在しなければ困ってしまいます。 そこで、kayacではおなじみの ecspressoを使用してTaskを立ち上げています。
ecspressoのscaleコマンドを使用することで、指定したTaskの数に変更しその数になるまで待ってくれます。
Portforward Task Desired count = 1 のステップを通過するときには、ほぼ確実に専用のECS Taskが1つ動いてることになります。
今回のWorkflowで使ったタスク定義は次のようになっています。
task-def.json
{
  "containerDefinitions": [
    {
      "cpu": 0,
      "essential": true,
      "image": "ghcr.io/mashiike/ecs-task-self-terminator",
      "logConfiguration": {
        "logDriver": "awslogs",
        "options": {
          "awslogs-group": "/ecs/gate",
          "awslogs-region": "ap-northeast-1",
          "awslogs-stream-prefix": "ecs-task-self-terminator"
        }
      },
      "environment": [
        {
          "name": "ECS_TST_LOG_FORMAT",
          "value": "json"
        },
        {
          "name": "ECS_TST_LOG_LEVEL",
          "value": "debug"
        },
        {
          "name": "ECS_TST_INITIAL_WAIT_TIME",
          "value": "30m"
        },
        {
          "name": "ECS_TST_IDLE_TIMEOUT",
          "value": "30m"
        },
        {
          "name": "ECS_TST_MAX_LIFE_TIME",
          "value": "24h"
        },
        {
          "name": "ECS_TST_SET_DESIRED_COUNT_TO_ZERO",
          "value": "true"
        },
        {
          "name": "ECS_TST_STOP_TASK",
          "value": "true"
        }
      ],
      "name": "ecs-task-self-terminator"
    }
  ],
  "executionRoleArn": "arn:aws:iam::123456789012:role/ecsTaskExecutionRole",
  "family": "gate",
  "cpu": "256",
  "memory": "512",
  "networkMode": "awsvpc",
  "requiresCompatibilities": [
    "FARGATE"
  ],
  "taskRoleArn": "arn:aws:iam::123456789012:role/gateECSTaskRole"
}
この定義中で使っているコンテナイメージは、私が作成した通称 自決コンテナイメージ です
どんなコンテナイメージかというと、ECS ExecやPortfowordのセッションの接続がなくなってから一定時間たったら、自動的に自らECS Taskの終了や ECS ServiceのScaleを0にするという機能を持ったコンテナイメージです。 今回の設定では、最大24時間の生存時間、最後の接続から30分間接続がなければ、自動的にECS Serviceのscaleを0にします。 ですので、連続でCIが実行されてれば既存のものがあり、CIが実行されなくなれば自然と踏み台用のTaskは終了するということになります。
ecstaでPortfowardをする。
      - name: Run ecsta
        run: |
          set -e
          TASK_ID=$(aqua exec ecsta list --region ap-northeast-1 --cluster default --service gate --family gate --output json | jq -s '.' | jq -r 'map(select(.lastStatus == "RUNNING")) | first | .taskArn')
          aqua exec ecsta \
            portforward \
            --region ap-northeast-1 \
            --cluster default \
            --service gate \
            --id $TASK_ID \
            --container ecs-task-self-terminator  \
            --family gate \
            --local-port 5439 \
            --remote-port 5439 \
            --remote-host default.123456789012.ap-northeast-1.redshift-serverless.amazonaws.com \
            &
      - name: Wait for portforward
        timeout-minutes: 1
        run: |
          while ! nc -z localhost 5439; do
            sleep 1
          done
こちらは ecstaの機能を多分に活用しています。
ecsta list は指定した条件に一致するECS Taskを列挙してくれるコマンドになります。
jqをうまいこと活用すると次のように、動いてるタスクのECS TaskのARNを一つ返してくれます。
$ aqua exec ecsta list --region ap-northeast-1 --cluster default --service gate --family gate --output json | jq -s '.' | jq -r 'map(select(.lastStatus == "RUNNING")) | first | .taskArn'
arn:aws:ecs:ap-northeast-1:123456789012:task/default/0123456789abcdef1234567890abcde
そして、ecsta portforward で返ってきた ECS Task ARNを使って接続します。
このとき最後に&をつけてるのがポイントです。こうすることでバックグラウンドでportforwardingを維持してくれます。
バックグランド実行なので、ちゃんと繋がるのを待つために、次のステップでncをしているのです。
ここで、一つ余談ですが今回の試みを社内Slackで話してたら次のPRが生まれました。
対応、本当にありがとうございます。
dbt test with redshift-credentials
最後に実際にdbtでテストをします。 ここで登場するのが、Redshiftの一時認証情報を手に入れてくれるラッパーコマンドです。
Redshift Serverlessを使う場合とても便利です。
dbtのprofile.ymlを次のようにしておくと、Redshift Serverlessでもこのラッパーコマンドで一時認証で実行できます。
sandbox:
  outputs:
    dev:
      dbname: dev
      host: localhost
      password: "{{ env_var('REDSHIFT_PASSWORD') }}"
      port: 5439
      schema: public
      threads: 5
      type: redshift
      user: "{{ env_var('REDSHIFT_USER') }}"
      keepalives_idle: 240
      ra3_node: true
      sslmode: require
  target: dev
こうしてGithub ActionsでRedshiftにアクセスしdbtのユニットテストができるようになりました。
最後の課題として残るとしたら、Test Reportに難がある点だとは思いますが、そこはいずれまた別の機会ということで。
まとめ
Github ActionsからRedshiftなどのAWS VPC内のリソースへアクセスする際には、ecstaのportforwardを使うと便利です。 今回の例では、dbtを取り上げましたが、もしかしたら他のユースケースもあるかもしれません。 もし、なにかGithub ActionsからAWS VPC内のリソースにアクセスする必要が出てきましたら、今回の内容を転用してみてはいかがでしょうか。
多数のOSSが連携することで目的を達成することができました。